NOTE:
DO NOT UPGRADE THRONE ROOM CARDS
UNLESS IT GETS MIRACULOUS!
DO NOT UPGRADE THRONE ROOM CARDS
UNLESS IT GETS MIRACULOUS!
Never upgrade a card unless it's miraculous. it will be a waste of time and astones and impossible for the card to enhance.
ENHANCING / UPGRADING CARDS
USING THE BAO BOT
1. Open KOC BAO tab and look for Auto Throne.
2. Select the card you want to enhance from the drop down menu (items list).
3. Once you selected the card you want to work on, click the enhance button until quality miraculous.
2. Select the card you want to enhance from the drop down menu (items list).
3. Once you selected the card you want to work on, click the enhance button until quality miraculous.
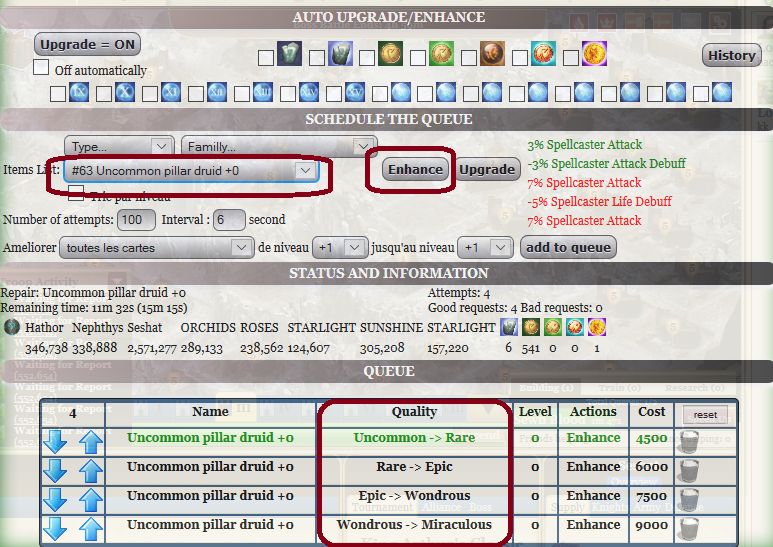
- Once an item is selected it will automatically add on the queue and enhance the card.
- If the item breaks during enhancement, it automatically repairs the broken card and continue to enhance until it gets miraculous. On the bot, you can use speedups / boosts to make the repairs faster.
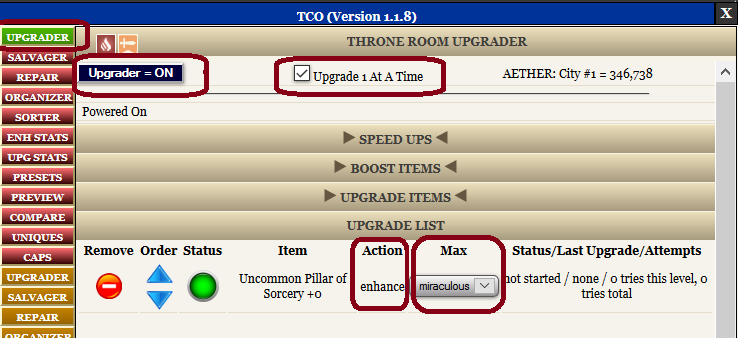
HOW TO ENHANCE CARDS USING THE TCO
Go to your inventory, click the card and click auto enhance.
Open the TCO and open the upgrader
- Check repair all items and enhance 1 card at a time
- turn the upgrader on
ACCESSING THE UPGRADE PANEL
Upgrade can be accessed through an item's context menu.
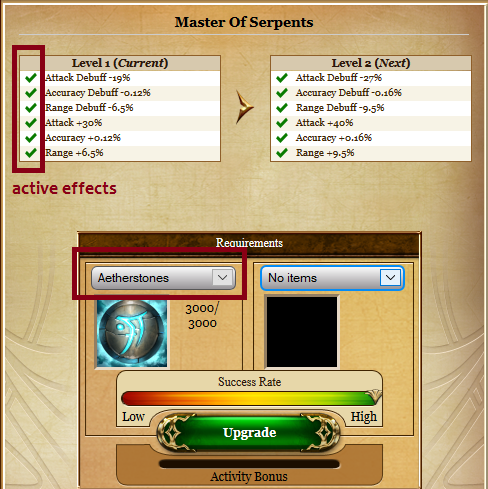
1. Name - The name of the item being Upgraded
2. Current - Current Effects on the item being Upgraded. The green check marks represent active Effects and the red X’s represent inactive Effects.
3. Next - The Effects of the item is the Upgrade is successful. Note- In the example, a successful Upgrade increases the power of each Effect.
4. Requirements (Resources) - The left portion of the Requirements section lists the amount of Aetherstones needed to Upgrade the item. If you do not have enough Aetherstones, you can spend Gems instead. If you have Aetherstones but do not wish to use them, you can select Gems from the left drop down list to use Gems instead.
5. Requirements (Items) – The right portion of the Requirements section lists optional Items that can be used in the next Upgrade attempt. These items cost Gems and can negate the effects of an unsuccessful Upgrade. If you do not have the Item you wish to use, you can spend Gems to buy and use the Item in the next Upgrade. The specific details of each item are listed in the last section of this guide.
6. Success Rate – Visually represents the difficulty of the next Upgrade. Using a Lesser Lucky Token or Lucky Token (explained below) will increase the success rate.
7. Upgrade Button – Pressing this button begins the Upgrade attempt. In an event that you are spending Gems (from any of the methods listed above) the total amount of Gems that will be deducted is listed in the Upgrade button.
HOW TO UPGRADE CARDS (BOT) Throne Tab:
What you need:
1. Aetherstones
2. Lesser lucky tokens/lucky tokens (crafted in spires) Level 3 spire
What you need:
1. Aetherstones
2. Lesser lucky tokens/lucky tokens (crafted in spires) Level 3 spire
HOW TO UPGRADE USING THE POWER BOT
- Open Power Bot and look for the THRONE ROOM TAB.
- Make sure you have enough aetherstones in your cities to use to upgrade the items.
- Select MIRACULOUS throne room items you would like to UPGRADE on the drop down menu and click UPGRADE ( 0 to 12+).
- Once an item is selected it will automatically add on the queue and upgrade the card.
- NOTE : If the item breaks during upgrade, it automatically repairs the broken card and continue to upgrade until it gets to the desired level of card you want.

ENHANCING AND UPGRADING MANUALLY:
Open the throne room tab.
1. UPGRADING
2. ENHANCING
Open the throne room tab.
1. UPGRADING
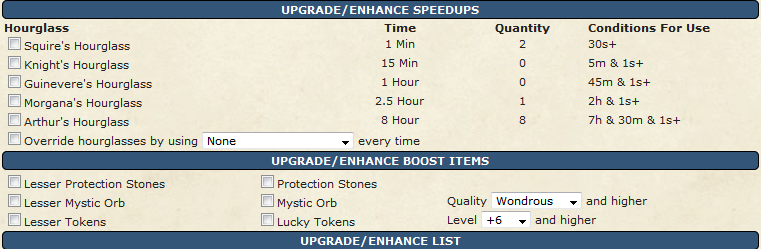
- protection stones
- lesser protection stone
- lesser lucky token
- lucky token
- super lucky token
- apprentice token
- aetherstones/gems
2. ENHANCING
- mystic orb
- protection stones,
- lesser protection stone
- aetherstones /gems

Master Tokens for upgrading

Apprentice Token for upgrading
|

Mystic Orb for enhancing

Epic Master Orb
|
MANUAL UPGRADE/ENHANCE
ANIMATION

successful upgrade/enhance
|

failed upgrade/enhance
|
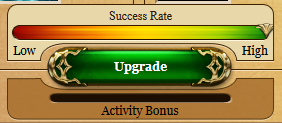
A new addition to the Upgrade system is the Activity Bonus. Every time Upgrade or Enhance is used, the Activity Bonus bar will increase, giving an additional success bonus to future attempts. If an item is not Upgraded or Enhanced after a short period of time, the bar will start to decrease, lowering the success bonus.
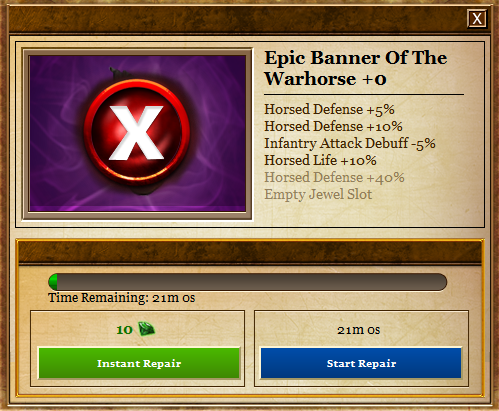
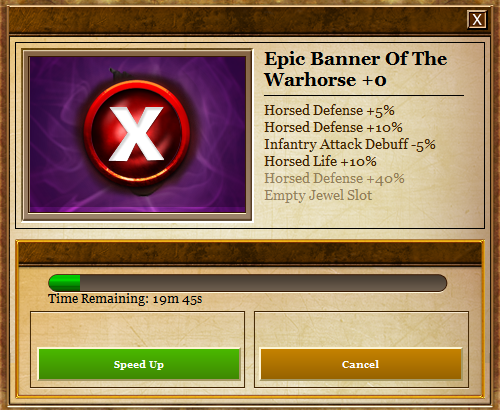
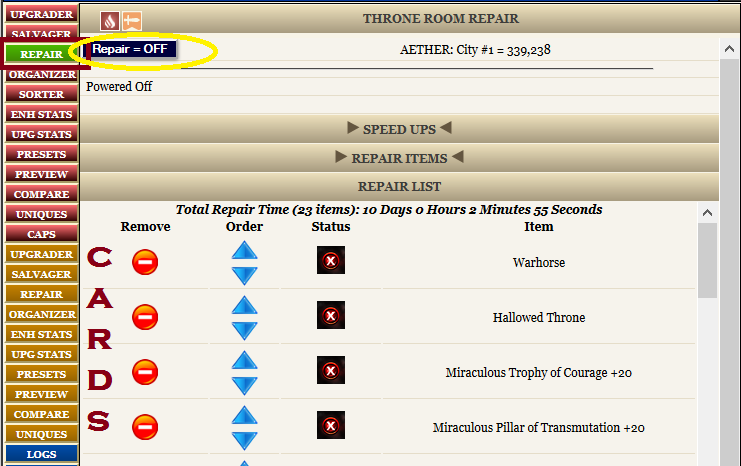
REPAIRING A BROKEN ITEM
If an unsuccessful UPGRADE/ENHANCE causes an item to break, the Repair modal will open for that item. This modal lists the Effects of the item that has broken and gives two options: INSTANT REPAIR, and START REPAIR. Instant Repair costs Gems and will do just that, instantly repair the broken item. If the Start Repair option is chosen, it will repair over time. Note that ONLY ONE item can be Repaired at a time.
A broken item in the Inventory will have a red X icon over its image. An item that is being repaired will have a hammer over its image.
A broken item in the Inventory will have a red X icon over its image. An item that is being repaired will have a hammer over its image.
|
|
REPAIRING CARDS USING THE BOT
- Open the throne room organizer and click inventory
- Click the card/cards you want to repair
- Choose repair tab and choose whether you want to repair 1 card or repair all broken cards in your throne room
- Open your TCO, click REPAIR ON,

ENHANCEMENT STATISTICS

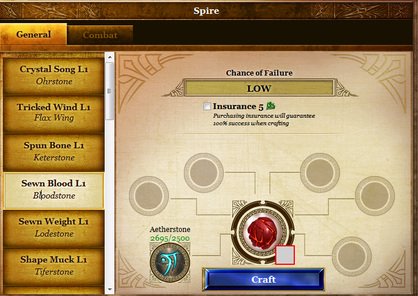
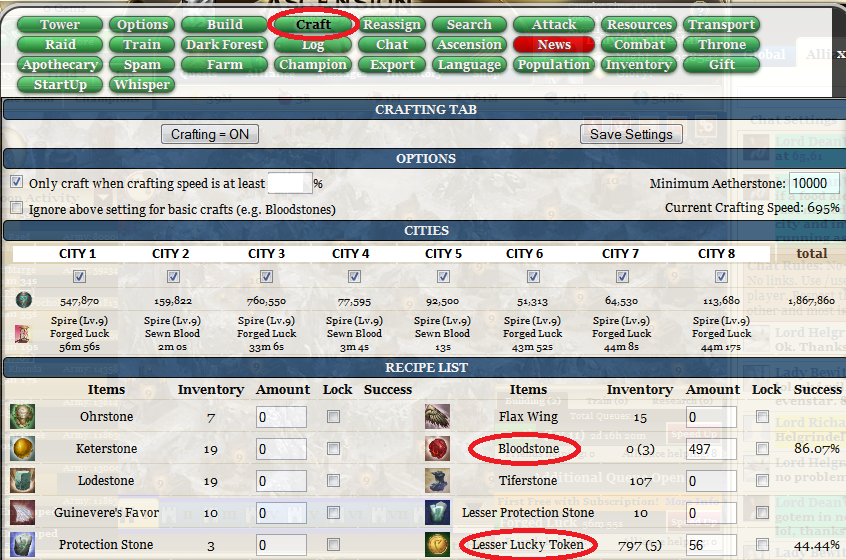
THE SPIRE - CRAFTING
HOW TO CRAFT BLOODSTONES IN THE SPIRE
BLOODSTONES (also called sewn blood)
2,500 AETHERSTONE TO CRAFT 1 BLOODSTONE
BLOODSTONES (also called sewn blood)
2,500 AETHERSTONE TO CRAFT 1 BLOODSTONE
LESSER LUCKY TOKEN (also called forged luck)
7,500 AETHERSTONE + 5 BLOODSTONE
TO CRAFT 1 LESSER LUCKY TOKEN
7,500 AETHERSTONE + 5 BLOODSTONE
TO CRAFT 1 LESSER LUCKY TOKEN
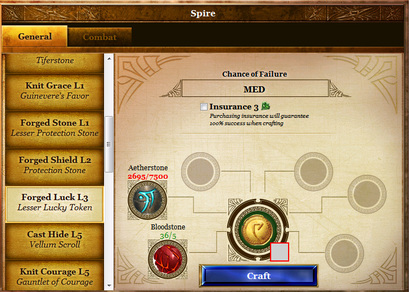
Using the BOT: Input the amount of bloodstones / lesser lucky token you want then save setting and craft on. All cities that have enough aetherstones and spires will automatically craft the items but consider the level of spire you have.
LEVEL 1
LEVEL 2
LEVEL 3
LEVEL 4
LEVEL 5
LEVEL 6
LEVEL 7
LEVEL 8
LEVEL 9
LEVEL 10
Notes: If you select more than one recipe, the crafting order will be done randomly. Lock means that the craft amount will not reduce, and crafting will continue until you have that number in your inventory. The success column shows you the crafting success percentage of each recipe.
- Crystal Song : Ohrstone
- Tricked Wind ; Flax Wing
- Sewn Blood : Bloodstone
- Sewn Weight : Lodestone
- Shape Muck : Tiferstone
- Knit Grace : Guinevere's Favor
- Forged Stone : Lesser Protection Stone
LEVEL 2
- Forged Shield : Protection Stone
- Forged Luck : Lesser Lucky Token
LEVEL 3
- Forged Luck : Lesser Lucky Token
- Aegis Rite : Stoneskin
- Poached Wind : Red Dragon Wings
- Trap Hunger : Horn of Bounty
LEVEL 4
- Crimson Toll L4Blood Fury
- Poach Hunger L4Horn of Majesty
- Aegis Toll L4Iron Skin
LEVEL 5
- Cast Hide ; Vellum Scroll
- Knit Courage ; Gauntlet of Courage
- Knit Wisdom : Mirror of Knowledge
- Knit Beauty ; Rose of Charisma
- Knit Toil : Gloves of Gathering
LEVEL 6
- Divine Act : Scroll of Blessing
- Forge Fury : Obsidian Rune
LEVEL 7
- Divine Rite : Blessed Water
LEVEL 8
- Divine Toll ; Divine Sacrament
LEVEL 9
- Divine Song : Divine Inspiration
LEVEL 10
- Divine Hymn : Divine Providence
- Mist Song : Aetherseal
- Mist Dirge : Ysbadden Seal
Notes: If you select more than one recipe, the crafting order will be done randomly. Lock means that the craft amount will not reduce, and crafting will continue until you have that number in your inventory. The success column shows you the crafting success percentage of each recipe.
